Hello All,
For Today's Tech Tip, we thought we would branch out from
just showcasing the great built in features of our controls and show off some
.NET functionality that can be applied to numerous scenarios involving many
different controls and applications.
Multi-Threading
The basic concept for multi-threading is to take the major processing away
from the main application thread (to avoid the dreaded "Not Responding" message
from windows), and also to be able to give proper feedback to users as tasks
process and complete.
A nice and easy way to reflect the current status of an operation is with,
everyone's favorite control, the Progress Bar. The Progress Bar is universally
understood, well if you are used to using computers at least :), and a very
simple way to display the needed information. The issue that arises when
trying to use it, is that trying to perform your processing and updating the
Progress Bar, will max out the current thread and bring the application to its
knees. This is where Multi-Threading comes in, because you can move ALL
of the processing operations to new threads, and leave the main thread to refresh
the Progress Bar with the progress as each thread reports back.
We have have put together a small sample that shows using two threads for
"processing" in addition to the main application thread.
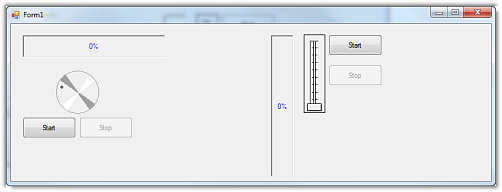
This sample uses the following controls, on a single form:
2
dbiMeter controls (used as Progress Bars)
1
dbiDial control (used to modify the increment of 1 dbiMeter)
1
dbiSlide control (used to modify the increment of 1 dbiMeter)
4 standard button controls (used for starting and stopping the additional
threads)
2 Background Worker controls (these controls will handle the additional
threads).
Here is what the form looks like with all the controls:
And because they are non-visual controls, the 2 Background Workers will
appear in the Designer Tray, below the form in the Visual Studio designer, like
so:

Now for the code:
Here we initialize the form, and set the range of the dbiDial and dbiSlide
controls. In this example, these two controls can be used to change the
value the dbiMeter controls will increment by (1-10). They are independent of
each other and only affect 1 dbiMeter each.
Private
Sub Form1_Load(ByVal
sender As Object,
ByVal e As
System.EventArgs) Handles
Me.Load
'Set up the dbiDial and dbiSlide controls with a few
parameters.
'These controls will be used to adjust the increments
of the dbiMeter controls.
Me.DbiDial1.Maximum = 10
Me.DbiDial1.Minimum = 1
Me.DbiDial1.Value = 1
Me.DbiSlide1.Maximum = 10
Me.DbiSlide1.Minimum = 1
Me.DbiSlide1.Value = 1
Me.DbiSlide1.ShowDivisions = 0
Me.DbiSlide1.ShowMax = 10
Me.DbiSlide1.ShowMin = 1
Me.ButtonStop1.Enabled =
False
Me.ButtonStop2.Enabled =
False
'The
background workers will be allowed to report their progress as well as be
cancelled
Me.BGW_DialMeter.WorkerReportsProgress
= True
Me.BGW_DialMeter.WorkerSupportsCancellation
= True
Me.BGW_SlideMeter.WorkerReportsProgress =
True
Me.BGW_SlideMeter.WorkerSupportsCancellation
= True
End Sub
And here is the code for the first group of controls (1 dbiMeter, 1 dbiDial,
2 standard buttons, and 1 of the Background Workers):
#Region
"dbiMeter 1, Horizontal"
Private Sub
ButtonStart1_Click(ByVal sender
As System.Object, ByVal
e As System.EventArgs)
Handles ButtonStart1.Click
Me.ButtonStart1.Enabled =
False
Me.ButtonStop1.Enabled =
True
Me.BGW_DialMeter.RunWorkerAsync()
'Start the background worker to run its process
End Sub
Private Sub
ButtonStop1_Click(ByVal sender
As System.Object, ByVal
e As System.EventArgs)
Handles ButtonStop1.Click
Me.BGW_DialMeter.CancelAsync()
'Tell the background worker to finish its processing
Me.ButtonStop1.Enabled =
False
Me.ButtonStart1.Enabled =
True
End Sub
Private Sub
BGW_DialMeter_DoWork(ByVal sender
As Object,
ByVal e As
System.ComponentModel.DoWorkEventArgs) Handles
BGW_DialMeter.DoWork
'To simulate processing, we will use a Do While Loop,
and issue a Sleep command
'As long as the background worker hasn't been told to
stop, the loop will continue
Do While
BGW_DialMeter.CancellationPending = False
'Update the dbiMeter control's value, to
represent the progress
If Me.DbiMeter1.Value
+ Me.DbiDial1.Value <= 100
Then
BGW_DialMeter.ReportProgress(Me.DbiMeter1.Value
+ Me.DbiDial1.Value)
Else
BGW_DialMeter.ReportProgress(0)
End If
System.Threading.Thread.Sleep(1000) 'Pause the
thread for 1 second
Loop
End Sub
Private Sub
BGW_DialMeter_ProgressChanged(ByVal sender
As Object,
ByVal e As
System.ComponentModel.ProgressChangedEventArgs) Handles
BGW_DialMeter.ProgressChanged
'The dbiMeter control is updated with the progress
reported by the background worker
Me.DbiMeter1.Value = e.ProgressPercentage
End Sub
#End
Region
The other set of controls has an identical set of code:
#Region
"dbiMeter 2, Vertical"
Private Sub
ButtonStart2_Click(ByVal sender
As System.Object, ByVal
e As System.EventArgs)
Handles ButtonStart2.Click
Me.ButtonStart2.Enabled =
False
Me.ButtonStop2.Enabled =
True
Me.BGW_SlideMeter.RunWorkerAsync()
'Start the background worker to run its process
End Sub
Private Sub
ButtonStop2_Click(ByVal sender
As System.Object, ByVal
e As System.EventArgs)
Handles ButtonStop2.Click
Me.BGW_SlideMeter.CancelAsync()
'Tell the background worker to finish its processing
Me.ButtonStop2.Enabled =
False
Me.ButtonStart2.Enabled =
True
End Sub
Private Sub
BGW_SlideMeter_DoWork(ByVal sender
As Object,
ByVal e As
System.ComponentModel.DoWorkEventArgs) Handles
BGW_SlideMeter.DoWork
'To simulate processing, we will use a Do While Loop,
and issue a Sleep command
'As long as the background worker hasn't been
told to stop, the loop will continue
Do While
BGW_SlideMeter.CancellationPending = False
'Update the dbiMeter control's value, to
represent the progress
If Me.DbiMeter2.Value
+ Me.DbiSlide1.Value <= 100
Then
BGW_SlideMeter.ReportProgress(Me.DbiMeter2.Value
+ Me.DbiSlide1.Value)
Else
BGW_SlideMeter.ReportProgress(0)
End If
System.Threading.Thread.Sleep(1000) 'Pause the
thread for 1 second
Loop
End Sub
Private Sub
BGW_SlideMeter_ProgressChanged(ByVal sender
As Object,
ByVal e As
System.ComponentModel.ProgressChangedEventArgs) Handles
BGW_SlideMeter.ProgressChanged
'The dbiMeter control is updated with the progress
reported by the background worker
Me.DbiMeter2.Value = e.ProgressPercentage
End Sub
#End
Region
When each of the Start buttons is pressed, they give the command to their
respective Background Worker to begin running asynchronously. The
Background Worker will then trigger its DoWork event. It is from this
event that all processing on the secondary thread processes (when the event
finishes, the Background Workers thread will automatically stop). In the example
posted, we simply used a Do While Loop and a Sleep command to simulate the event
performing a process. In reality, you can use these events to handle your
data load, or an update process, or even a constant validation routine when
working in a multi-user data environment.
To stop either of the Background Workers, simply press one of the stop buttons.
This will call the CancelAsync method on the respective worker thread, which
will set it as CancellationPending = True, which will end the process inside the
DoWork event (stopping the thread).
If you would like a closer look at the sample, in either a working example or
the source code, please see the following links:
Run a Smart Client sample:
Download a compiled version of the sample:
Download the Visual Basic .NET Visual Studio 2008 source code:
Take care and have a nice day!
|